Dell 2950 III is one of the best bang for the buck servers you can find on Ebaym but there is one problem this server runs very loud by design.
Example (video Credit David Lohle)
I have my lab setup in my room so I had to do something about this.
After wondering around in the OSMA, DRAC and BIOS with no luck, I turned to almighty Google for help.
Turns out Dell decided not to expose the BMC’s fan controller settings to the users. It’s baked in to the firmware.
Reducing the noise involves two mods, hardware and firmware.
- Fan MOD – Lower the Fan speeds to reduce the noise
- Firmware mod – Lowering the BMC fan rpm thresholds
Update:
I stress tested the server after the mod, check here for details – Dell PE 2950 Stress test
01. Fan MOD – Lower the Fan speeds to reduce the noise
I stumbled upon this post on the “Blind Caveman’s blog”. – http://blindcaveman.wordpress.com/2013/08/23/problem-dell-poweredge-2950-iii-jet-engine-fan-noise/
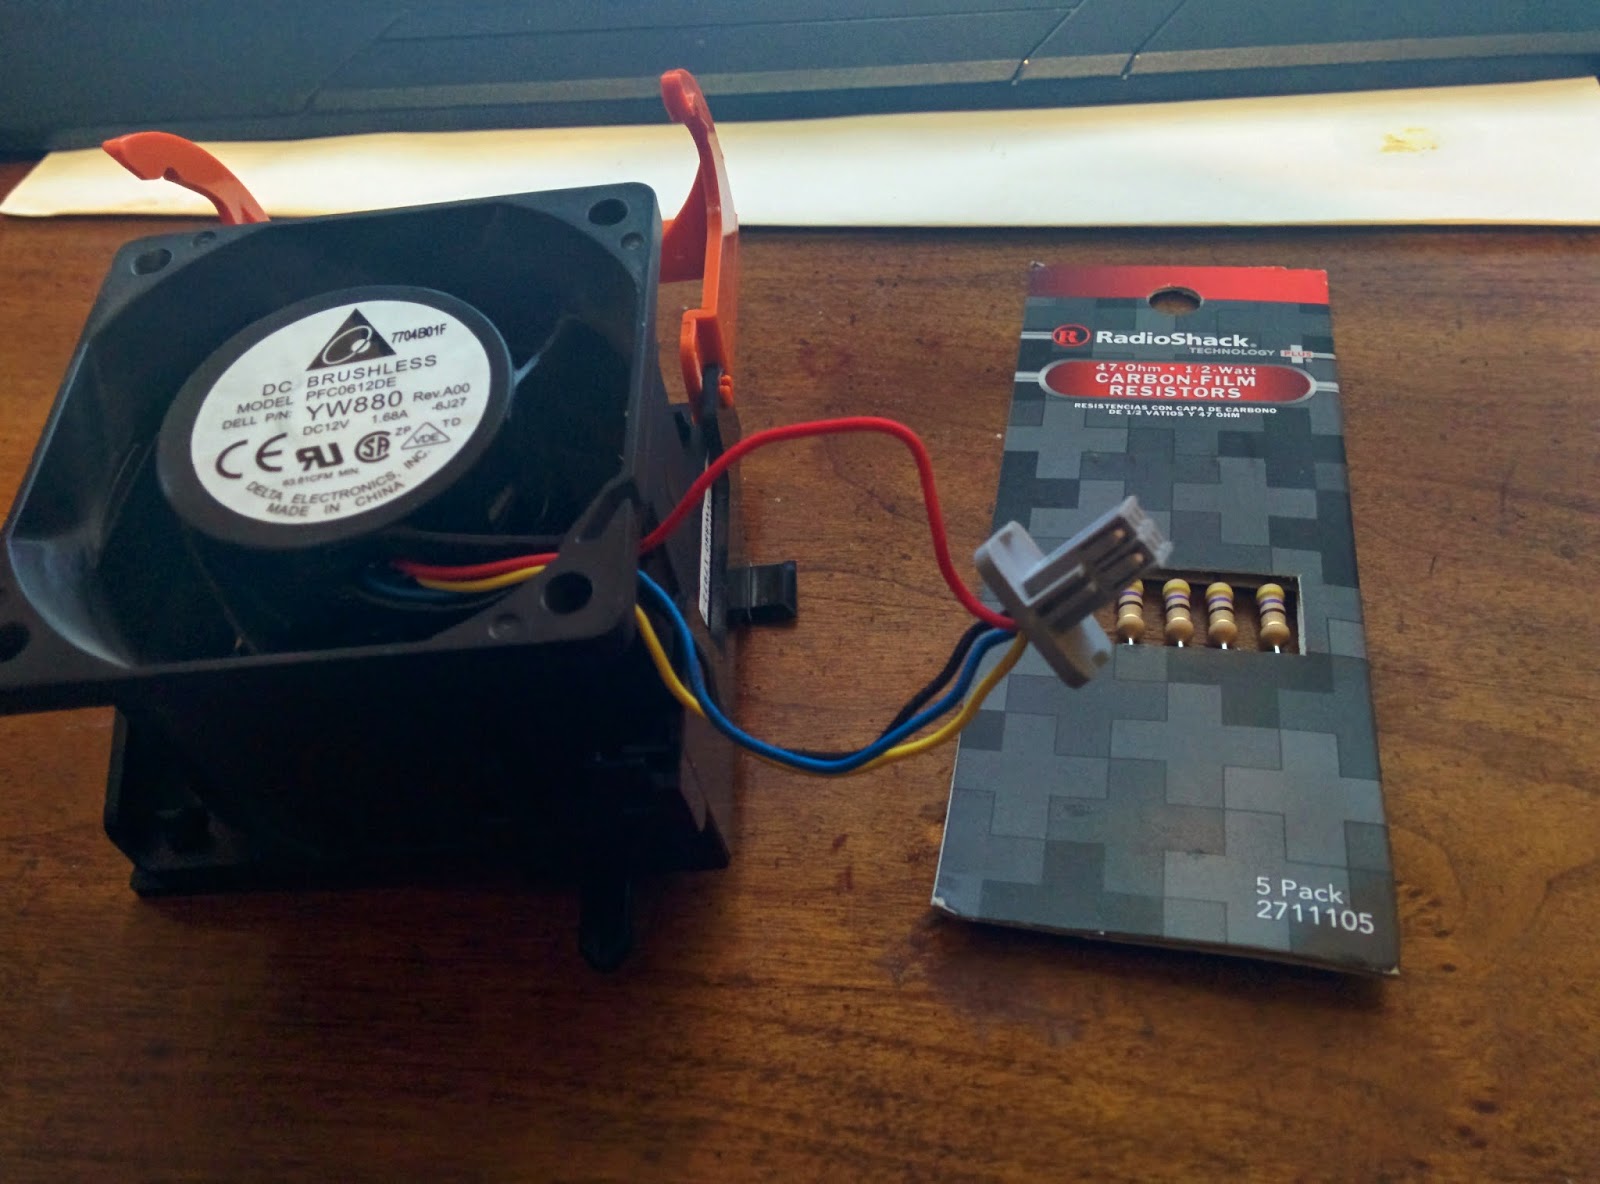
Apparently he had success with adding a 47ohm resistor in line to all 4 intake fans, he has a very comprehensive guide on the mod.
I’m just going to put the summery of what I did. (Props to Caveman for coming up with this solution)
Items you need
- 4pc of 47ohm ½ watt resistors. (Radio shack $1.49)
- Heat Shrink. (Radio shack $4.59)
- Soldering iron.
Note : You can drop the resistor value to increase the fan voltage
10v = 12 ohms
9v = 2020 ohms
8v = 3030 ohms
7v = 4242 ohms
Fan Mod – Steps
01. Remove the cover.
02. Remove the fan by pulling the orange tabs and gently lifting up.
03. Remove the wire clip cut the “Red” wire and solder the resistor in line with the wire.
 |
| Red Wire |
04. Re-seat the fans back on the server. (be careful not to let it touch the heat sink right next to it)
 |
| Watch out for the Heat-sink |
|
|
|
|
Note:
I just modded the intake fans, OP suggest to mod the PSU fans but I don’t think you need to mess with the power supply fans for 3 reasons.
- It’s not going to make a huge difference. (my PE is running below 52db with just the intake fans modded)
- PSU is Expensive to replace. (on Ebay PSU is around $100 but four Dell 2950 Fans cost less than $10)
- I believe the PSU units should run very cool and efficient as much as possible.
—————————————————————————————————————————
So after the mod, I booted up the server, it was running significantly quieter. BUT… yes there’s a huge but….
Issue 01 – OSMA Errors and fan speed issues
The fan speeds were ramping up and down every few minutes.
When i monitored the fan speeds via DRAC and it showed an error with the fans failing since the idle rpm is lower than the minimum rpm threshold.
What is happening
the BMC lower the fan RPM after the initial boot, since the resistor is in place the lowest RPM is around 1800 and the default minimum RPM error threshold is 2250rpm so the BMC panics, spins the fans back up to 100%, lower them again since the error is cleared. So on. it was going on in a never ending cycle of annoyingness.
So after some more google fu. I found a post written by a German “Artificial intelligence researcher” who faced the same issue after he swapped out the dell fans with lower RPM ones and since dell refused to help him fix it, he engineered his own fix for this by modifying the BMC firmware to reduce the minimum rpm threshold (how cool is that).
His name is Arnuschky – Link | Post link
His post is well written to the point (Kudos to you sir) but its not very noob friendly. 🙁
So I’m going to make a step by step guide using his post as reference with few more additions, for anyone who is new to open source and messing with dell firmwares.
02. Firmware mod – Lowering the BMC fan rpm thresholds
The solution explained-
Arnuschky figured out the exact setting in the BMC’s firmware, the check-sums etc to modify the fan rpm thresholds and wrote a very nifty script to help us modify the values on a downloaded firmware file.
What is BMC (board management controller)
- Among many other things, fans are controlled by the BMC and the fan curve and all the values are baked in to the firmware.
- BMC (board management controller) by design will ramp up the RPM of the fans every time you add more hardware to the system such as – Add-on cards, RAM, HDD’s, etc
What is IPMI
- Intelligent Platform Management Interface, this tool set can be easily installed on any linux distribution and after you enable IPMI in the BIOS (DRAC interface) you can query sensory data from BMC and configure parameters on the BMC.
Procedure
Things you should know –
- This worked for many people including me. Myself nor anyone involved will not be held responsible for any damages caused by proceeding with the firmware mod.
- You cannot perform this mod on ESXI. But if you are running a base OS like Redhat/CentOS/Ubuntu you should be good to go.
- You cannot flash the firmware using a VM (If you know a way please let us know)
- To modify the firmware you have to be on a Linux server, you can technically flash the modified firmware from windows server. I will add the details later in the post
Packages required
- BMC Firmware file – Dell Drivers and support
- IPMI tools
- glibc.i686 (If you are on a 64bit OS)
I have Esxi 5.5 installed on the Dell server so I used a Cent OS 6.4 installation running off a USB stick to do the modifications and flashing
Enable IPMI on the DRAC interface
- You can do this by logging in to the DRAC web interface or though the bios screen
- Press ctrl+E during the post screen to access the DRAC card configuration screen and Enable IPMI
Setting up IPMI Tools
yum install OpenIPMI OpenIPMI-tools
StartEnable the Service
chkconfig ipmi on
service ipmi start
Run the following commands to see if IPMI is working
ipmitool sdr type Temperature
Temp             | 01h | ok  |  3.1 | -48 degrees C
Temp             | 02h | ok  |  3.2 | -42 degrees C
Temp             | 05h | ok  | 10.1 | 40 degrees C
Temp             | 06h | ok  | 10.2 | 40 degrees C
Ambient Temp     | 08h | ok  |  7.1 | 27 degrees C
CPU Temp Interf  | 76h | ns  |  7.1 | Disabled
ipmitool sdr type Fan
FAN 1 RPM        | 30h | ok  |  7.1 | 4200 RPM
FAN 2 RPM        | 31h | ok  |  7.1 | 4200 RPM
FAN 3 RPM        | 32h | ok  |  7.1 | 4200 RPM
FAN 4 RPM        | 33h | ok  |  7.1 | 4200 RPM
FAN 5 RPM        | 34h | ok  |  7.1 | 4200 RPM
FAN 6 RPM        | 35h | ok  |  7.1 | 4200 RPM
Fan Redundancy   | 75h | ok  |  7.1 | Fully Redundant
Install glibc.i686
yum install glibc.i686
note:
Firmware Flash program is 32bit and it will fail with the following warning on 64bit OS
/lib/ld-linux.so.2: bad ELF interpreter: No such file or directory
Download the relevant firmware file
- Visit – http://www.dell.com/support/
- Select OS version – Redhat or any other linux flavor (This will allow you to download the .bin file containing the firmware, this is what we need to modify the values)
To save you time here’s the link for the Dell PE 2950 II, BMC firmware V2.50 – direct link
mkdir bmcfwmod
cd bmcfwmod                                  #create project directory
wget "http://downloads.dell.com/FOLDER00928606M/1/2950_ESM_Firmware_4NNNG_LN32_2.50_A00.BIN"
Set permissions and extract the firmware .bin file
chmod 755 BMC_FRMW_LX_R223079.BIN                              # make executable
sudo mkdir bmc_firmware                                        # create dir as root
sudo ./BMC_FRMW_LX_R223079.BIN --extract bmc_firmware          # yes, you have to do this as root! :(
cd bmc_firmware
Note : You have to extract the bin file in-order to proceed..
Above commands will extract the firmware bin file, in to the bmc_firmware folder.
Check inside the folder to see if you have a file called /payload/bmcflsh.dat.
If not that means your system is not compatible with this mod. If yes, please continue.
Patching the firmware file
Note:
You should be in the bmc_firmware directory created above
Download and run the script
–no-check-certificate switch is used to get around the cert issue due to the github domain name mismatch
wget "https://raw.github.com/arnuschky/dell-bmc-firmware/master/adjust-fan-thresholds/dell-adjust-fan-thresholds.py --no-check-certificate"
chmod 755 dell-adjust-fan-thresholds.py    # set permissions
./dell-adjust-fan-thresholds.py payload/bmcflsh.dat  #execute the py script on the bmcflsh.dat file
The script will prompt you with the following screen
Select your server model in this case I selected Dell PowerEdge 2950 = number 3
Then it will prompt you to select the fans and adjust the threshold.
On the DRAC interface the intake fans shows up numbered 1-4,
I edited the values for the fans 1 thorough 4 (Only the intake fans will be effected)
Setting the value
When you select the fan number it will ask you to enter the value for the new threshold
This should be entered in multiples of 75 for example the default value is 2025 which is a 27×75 so the default value is 27
So to reduce the threshold value you need to enter something lower than 27
I choose 18 as the value, this will drop my threshold to 1350rpm (18×75=1350)
Saving the changes
After editing the appropriate values, enter “W” to write the changes to the firmware as prompted.
This will update the bmcflsh.dat with the modified values
Flashing the modified firmware
If you are on a 64bit OS make sure you have the glibc.i686 package installed
LD_LIBRARY_PATH=./hapi/opt/dell/dup/lib:$LD_LIBRARY_PATH ./bmcfl32l -i=payload/bmcflsh.dat –f
This will map the necessary Shared Libraries and execute the bmcfl32l to flash the firmware file
Fans will rev up and stop for a brief moment during the update, don’t worry it will spool up again in a second.
You do not need to reboot to see the changes, but do a reboot just in case.
So there you go, your Dell 2950 should be purring away on the shelf silently.
Note:
You should disable the IPMI on DRAC since it is a big security risk.
Tested for more 24 hours
Update: Dell PE 2950 Stress test after the mod
- No noticeable temperature difference with the components
- No post errors
- No OMSA or DRAC errors
Noise Level comparison
Before the mod
After the mod
Its a very long post and its almost morning. so forgive me for any grammar, spelling or formatting mistakes.
Until next time…….
