
What is VSX?
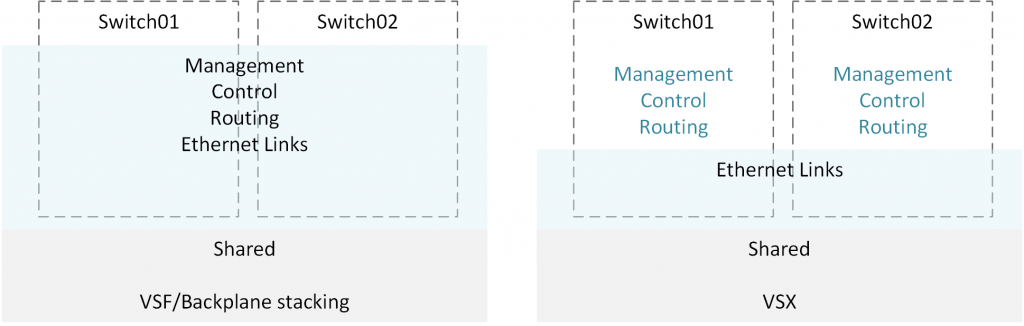
VSX is a cluster technology that allows the two VSX switches to run with independent control planes (OSPF/BGP) and present themselves as different routers in the network. In the datapath, however, they function as a single router and support active-active forwarding.
VSX allows you to mitigate inherent issues with a shared control plane that comes with traditional stacking while maintaining all the benefits
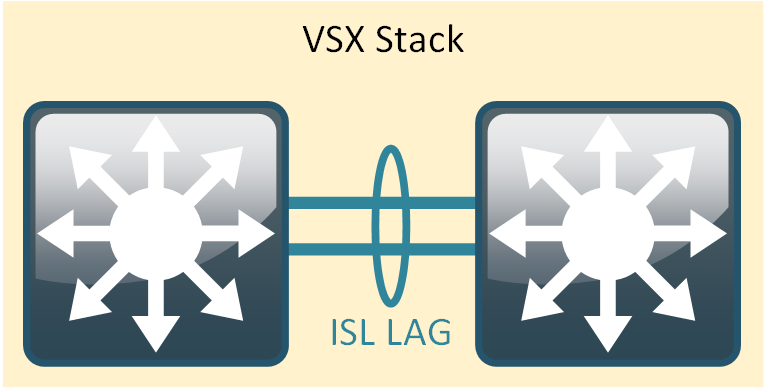
- Control plane: Inter-Switch-Link and Keepalive
- Data plane L2: MCLAGs
- Data plane L3: Active gateway
This is a very similar technology compared to Dell VLT stacking with Dell OS10
Basic feature Comparison with Dell VLT Stacking
| Dell VLT Stacking | Aruba VSX |
| Supports Multi chassis Lag | ✅ | ✅ |
| independent control planes | ✅ | ✅ |
| All active-gateway configuration (L3 load balancing) | ✅(VLT Peer routing) | ✅(VSX Active forwarding) |
| Layer 3 Packet load balancing | ✅ | ✅ |
| Can Participate in Spanning tree MST/RSTP | ✅ | ✅ |
| Gateway IP Redundancy | ✅VRRP | ✅(VSX Active Gateway or VRRP) |
Setup Guide
What you need?
- 10/25/40/100GE Port for the interswitch link
- VSX supported switch, VSX is only supported on switches above CX6300 SKU
| Switch Series | VSX |
| CX 6200 series | X |
| CX 6300 series | X |
| CX 6400 series | ✅ |
| CX 8200 series | ✅ |
| CX 8320/8325 series | ✅ |
| CX 8360 series | ✅ |
**Updated 2020-DecFor this guide im using a 8325 series switch
Dry run
- Setup LAG interface for the inter-switch link (ISL)
- Create the VSX cluster
- Setup a keepalive link and a new VRF for the keepalive traffic
Setup LAG interface for the inter-switch link (ISL)
In order to form the VSX cluster, we need a LAG interface for the inter switch communication
Naturally i pick the fastest ports on the switch to create this 10/25/40/100GE
Depending on what switch you have, The ISL bandwidth can be a limitation/Bottleneck, Account for this factor when designing a VSX based solution
Utilize VSX-Activeforwarding or Active gateways to mitigate this
Create the LAG interface
This is a regular Port channel no special configurations, you need to create this on both switches
- Native VLAN needs to be the default VLAN
- Trunk port and All VLANs allowed
CORE01#

interface lag 256
no shutdown
description VSX-LAG
no routing
vlan trunk native 1 tag
vlan trunk allowed all
lacp mode active
exit


-------------------------------

CORE02#

interface lag 256
no shutdown
description VSX-LAG
no routing
vlan trunk native 1 tag
vlan trunk allowed all
lacp mode active
exit
Add/Assign the physical ports to the LAG interface
I’m using two 100GE ports for the ISL LAG

CORE01#

interface 1/1/55
no shutdown
lag 256
exit
interface 1/1/56
no shutdown
lag 256
exit

-------------------------------

CORE02#

interface 1/1/55
no shutdown
lag 256
exit
interface 1/1/56
no shutdown
lag 256
exit
Do the same configuration on the VSX Peer switch (Second Switch)
Connect the cables via DAC/Optical and confirm the Port-channel health
CORE01# sh lag 256
System-ID       : b8:d4:e7:d5:36:00
System-priority : 65534

Aggregate lag256 is up
 Admin state is up
 Description : VSX-LAG
 Type                        : normal
 MAC Address                 : b8:d4:e7:d5:36:00
 Aggregated-interfaces       : 1/1/55 1/1/56
 Aggregation-key             : 256
 Aggregate mode              : active
 Hash                        : l3-src-dst
 LACP rate                   : slow
 Speed                       : 200000 Mb/s
 Mode                        : trunk


-------------------------------------------------------------------

CORE02# sh lag 256
System-ID       : b8:d4:e7:d5:f3:00
System-priority : 65534

Aggregate lag256 is up
 Admin state is up
 Description : VSX-LAG
 Type                        : normal
 MAC Address                 : b8:d4:e7:d5:f3:00
 Aggregated-interfaces       : 1/1/55 1/1/56
 Aggregation-key             : 256
 Aggregate mode              : active
 Hash                        : l3-src-dst
 LACP rate                   : slow
 Speed                       : 200000 Mb/s
 Mode                        : trunk
Form the VSX Cluster
under the configuration mode, go in to the VSX context by entering “vsx” and issue the following commands on both switches
CORE01#

vsx
    inter-switch-link lag 256
    role primary
    linkup-delay-timer 30

-------------------------------

CORE02#

vsx
    inter-switch-link lag 256
    role secondary
    linkup-delay-timer 30
Check the VSX Status
CORE01# sh vsx status
VSX Operational State
---------------------
  ISL channel             : In-Sync
  ISL mgmt channel        : operational
  Config Sync Status      : In-Sync
  NAE                     : peer_reachable
  HTTPS Server            : peer_reachable

Attribute           Local               Peer
------------        --------            --------
ISL link            lag256              lag256
ISL version         2                   2
System MAC          b8:d4:e7:d5:36:00   b8:d4:e7:d5:f3:00
Platform            8325                8325
Software Version    GL.10.06.0001       GL.10.06.0001
Device Role         primary             secondary

----------------------------------------

CORE02# sh vsx status
VSX Operational State
---------------------
  ISL channel             : In-Sync
  ISL mgmt channel        : operational
  Config Sync Status      : In-Sync
  NAE                     : peer_reachable
  HTTPS Server            : peer_reachable

Attribute           Local               Peer
------------        --------            --------
ISL link            lag256              lag256
ISL version         2                   2
System MAC          b8:d4:e7:d5:f3:00   b8:d4:e7:d5:36:00
Platform            8325                8325
Software Version    GL.10.06.0001       GL.10.06.0001
Device Role         secondary           primary
Setup the Keepalive Link
its recommended to set up a Keepalive link to avoid Split-brain scenarios if the ISL goes down, We are trying to prevent both switches from thinking they are the active devices creating STP loops and other issues on the network
This is not a must-have, it’s nice to have, As of Aruba CX OS 10.06.x you need to sacrifice one of your data ports for this
Dell OS10 VLT archives this via the OOBM network ports, Supposedly Keepalive over OOBM is something Aruba is working on for future releases
Few things to note
- It’s recommended using a routed port in a separate VRF for the keepalive link
- can use a 1Gbps link for this if needed
Provision the port and VRF
CORE01#

vrf KEEPALIVE

interface 1/1/48
no shutdown
vrf attach KEEPALIVE
description VSX-keepalive-Link
ip address 192.168.168.1/24
exit

-----------------------------------------

CORE02#

vrf KEEPALIVE

interface 1/1/48
no shutdown
vrf attach KEEPALIVE
description VSX-keepalive-Link
ip address 192.168.168.2/24
exit
Define the Keepalive link
Note – Remember to define the vrf id in the keepalive statement
Thanks /u/illumynite for pointing that out
CORE01#

vsx
    inter-switch-link lag 256
    role primary
    keepalive peer 192.168.168.2 source 192.168.168.1 vrf KEEPALIVE
    linkup-delay-timer 30

-----------------------------------------

CORE02#

vsx
    inter-switch-link lag 256
    role secondary
    keepalive peer 192.168.168.1 source 192.168.168.2 vrf KEEPALIVE
    linkup-delay-timer 30
Next up…….
- VSX MC-LAG
- VSX Active forwarding
- VSX Active gateway
References
AOS-CX 10.06 Virtual SwitchingExtension (VSX) Guide
As always if you notice any mistakes please do let me know in the comments
