Kafka Deployment with Strimzi Operator and Envoy

This guide walks through the deployment of a production-ready Apache Kafka cluster on Kubernetes using the Strimzi Operator, complete with user authentication, RBAC permissions, and an Envoy proxy for external access.

Deliverables

  • High availability with 3 controllers and 3 brokers
  • User authentication with SCRAM-SHA-512
  • Fine-grained access control through ACLs
  • External access through an Envoy proxy
  • SSL/TLS is not setup to keep this exserse simple, this will be covered in another blog post

Table of Contents

Step 1: Install Strimzi Operator

First, install the Strimzi Kafka Operator using Helm:

helm repo add strimzi https://strimzi.io/charts/
helm repo update

helm install strimzi-kafka-operator strimzi/strimzi-kafka-operator 
  --namespace kafka 
  --create-namespace


This creates a dedicated kafka namespace and installs the Strimzi operator that will manage our Kafka resources.

Step 2: Deploy Kafka Cluster

Install Custom Resource Definitions (CRDs)

Apply the necessary CRDs that define Kafka-related resources:

# Install all CRDs
kubectl apply -f https://raw.githubusercontent.com/strimzi/strimzi-kafka-operator/refs/heads/main/install/cluster-operator/040-Crd-kafka.yaml
kubectl apply -f https://raw.githubusercontent.com/strimzi/strimzi-kafka-operator/refs/heads/main/install/cluster-operator/04A-Crd-kafkanodepool.yaml
kubectl apply -f https://raw.githubusercontent.com/strimzi/strimzi-kafka-operator/refs/heads/main/install/cluster-operator/043-Crd-kafkatopic.yaml
kubectl apply -f https://raw.githubusercontent.com/strimzi/strimzi-kafka-operator/refs/heads/main/install/cluster-operator/044-Crd-kafkauser.yaml


Setup Kafka Node Pools

Create a file named 10-nodepools.yaml with the following content:

apiVersion: kafka.strimzi.io/v1beta2
kind: KafkaNodePool
metadata:
  name: controllers
  namespace: kafka
  labels:
    strimzi.io/cluster: mkbits-strimzi-cluster01
spec:
  replicas: 3
  roles:
    - controller
  storage:
    type: persistent-claim
    class: longhorn
    size: 10Gi
    deleteClaim: false
---
apiVersion: kafka.strimzi.io/v1beta2
kind: KafkaNodePool
metadata:
  name: brokers
  namespace: kafka
  labels:
    strimzi.io/cluster: mkbits-strimzi-cluster01
spec:
  replicas: 3
  roles:
    - broker
  storage:
    type: persistent-claim
    class: longhorn
    size: 20Gi
    deleteClaim: false


This creates

  • 3 Kafka controller nodes with 10GB storage each
  • 3 Kafka broker nodes with 20GB storage each
  • Using the longhorn storage class for persistence


Apply the node pools configuration:

kubectl apply -f 10-nodepools.yaml


Create the Kafka Cluster

Create a file named 20-kafka.yaml with the following content:

apiVersion: kafka.strimzi.io/v1beta2
kind: Kafka
metadata:
  name: mkbits-strimzi-cluster01
  namespace: kafka
  annotations:
    strimzi.io/kraft: "enabled"
    strimzi.io/node-pools: "enabled"
spec:
  kafka:
    version: 3.9.0
    config:
      inter.broker.protocol.version: "3.9"
      log.message.format.version:  "3.9"
      offsets.topic.replication.factor: 3
      transaction.state.log.replication.factor: 3
      transaction.state.log.min.isr: 2
    listeners:
      - name: tls
        port: 9093
        type: internal
        tls: true
        authentication:
          type: scram-sha-512
      - name: plain
        port: 9092
        type: internal
        tls: false
        authentication:
          type: scram-sha-512
    authorization:
      type: simple
  entityOperator:
    topicOperator: {}
    userOperator: {}
Important Details:
  • Uses Kafka version 3.9.0 with KRaft mode enabled (no ZooKeeper)
  • Configures both TLS (9093) and plain (9092) internal listeners
  • Both listeners use SCRAM-SHA-512 authentication
  • Simple authorization is enabled for access control
  • Topic and User operators are enabled for managing topics and users

Apply the Kafka cluster configuration:

kubectl apply -f 20-kafka.yaml


Step 3: Configure Users and Permissions

User Creation

Create the following YAML files for different user configurations:

30-users.yaml:

apiVersion: kafka.strimzi.io/v1beta2
kind: KafkaUser
metadata:
  name: kafka-prod-user
  namespace: kafka
  labels:
    strimzi.io/cluster: mkbits-strimzi-cluster01
spec:
  authentication:
    type: scram-sha-512
  authorization:
    type: simple
    acls:
      - resource:
          type: topic
          name: prod_Topic01
          patternType: literal
        operation: All
      - resource:
          type: topic
          name: prod_Topic02
          patternType: literal
        operation: All
---   
apiVersion: kafka.strimzi.io/v1beta2
kind: KafkaUser
metadata:
  name: kafka-dev-user
  namespace: kafka
  labels:
    strimzi.io/cluster: mkbits-strimzi-cluster01
spec:
  authentication:
    type: scram-sha-512
  authorization:
    type: simple
    acls:
      - resource:
          type: topic
          name: dev_Topic01
          patternType: literal
        operation: All

 Apply each user configuration:

kubectl apply -f 30-users.yaml


Retrieving User Credentials

Strimzi stores user credentials in Kubernetes secrets. Retrieve them with:

kubectl get secret <username> -n kafka -o jsonpath="{.data.password}" | base64 --decode


Example:

kubectl get secret kafka-prod-user -n kafka -o jsonpath="{.data.password}" | base64 --decode


Step 4: Create Topics

40-KafkaTopic.yaml

# topics-bundle.yaml
apiVersion: kafka.strimzi.io/v1beta2
kind: KafkaTopic
metadata:
  name: prod_Topic01
  namespace: kafka
  labels:
    strimzi.io/cluster: mkbits-strimzi-cluster01
spec:
  partitions: 6
  replicas: 3
---
apiVersion: kafka.strimzi.io/v1beta2
kind: KafkaTopic
metadata:
  name: prod_Topic02
  namespace: kafka
  labels:
    strimzi.io/cluster: mkbits-strimzi-cluster01
spec:
  partitions: 3
  replicas: 3
  config:
    cleanup.policy: delete             # ordinary log-retention-Default-7-Days
---
apiVersion: kafka.strimzi.io/v1beta2
kind: KafkaTopic
metadata:
  name: dev_Topic01
  namespace: kafka
  labels:
    strimzi.io/cluster: mkbits-strimzi-cluster01
spec:
  partitions: 3
  replicas: 3
  config:
    retention.ms: 86400000             # 1-day


Step 5: Deploy Envoy as a Kafka-Aware Proxy

Envoy serves as a protocol-aware proxy for Kafka, enabling:

  • Centralized connection handling
  • Reduced NAT complexity
  • External access to the Kafka cluster
  • Advanced routing and observability

Understanding Kafka DNS in Kubernetes

Strimzi creates headless services for Kafka brokers. In Kubernetes, pod DNS follows this format:

<pod-name>.<headless-service>.<namespace>.svc.cluster.local


For our Strimzi deployment, the elements are:

ComponentPatternExample
Pod name<cluster>-<pool>-<ordinal>mkbits-strimzi-cluster01-brokers-0
Headless service<cluster>-kafka-brokersmkbits-strimzi-cluster01-kafka-brokers

This gives us the following broker FQDNs:

mkbits-strimzi-cluster01-brokers-0.mkbits-strimzi-cluster01-kafka-brokers.kafka.svc.cluster.local
mkbits-strimzi-cluster01-brokers-1.mkbits-strimzi-cluster01-kafka-brokers.kafka.svc.cluster.local
mkbits-strimzi-cluster01-brokers-2.mkbits-strimzi-cluster01-kafka-brokers.kafka.svc.cluster.local


Creating Envoy Configuration

Create a file named envoy-config.yaml:

apiVersion: v1
kind: ConfigMap
metadata:
  name: envoy-config
  namespace: kafka
data:
  envoy.yaml: |
    static_resources:
      listeners:
        - name: kafka_listener
          address:
            socket_address:
              address: 0.0.0.0
              port_value: 9094
          filter_chains:
            - filters:
                - name: envoy.filters.network.kafka_broker
                  typed_config:
                    "@type": type.googleapis.com/envoy.extensions.filters.network.kafka_broker.v3.KafkaBroker
                    stat_prefix: kafka
                    id_based_broker_address_rewrite_spec:
                      rules:
                        - id: 0
                          host: kafka-prod-eastus01.multicastbits.com
                          port: 9094
                        - id: 1
                          host: kafka-prod-eastus01.multicastbits.com
                          port: 9094
                        - id: 2
                          host: kafka-prod-eastus01.multicastbits.com
                          port: 9094
                - name: envoy.filters.network.tcp_proxy
                  typed_config:
                    "@type": type.googleapis.com/envoy.extensions.filters.network.tcp_proxy.v3.TcpProxy
                    stat_prefix: tcp
                    cluster: kafka_cluster
      clusters:
        - name: kafka_cluster
          connect_timeout: 1s
          type: strict_dns
          lb_policy: round_robin
          load_assignment:
            cluster_name: kafka_cluster
            endpoints:
              - lb_endpoints:
                  - endpoint:
                      address:
                        socket_address:
                          address: mkbits-strimzi-cluster01-brokers-0.mkbits-strimzi-cluster01-kafka-brokers.kafka.svc.cluster.local
                          port_value: 9092
                  - endpoint:
                      address:
                        socket_address:
                          address: mkbits-strimzi-cluster01-brokers-1.mkbits-strimzi-cluster01-kafka-brokers.kafka.svc.cluster.local
                          port_value: 9092
                  - endpoint:
                      address:
                        socket_address:
                          address: mkbits-strimzi-cluster01-brokers-2.mkbits-strimzi-cluster01-kafka-brokers.kafka.svc.cluster.local
                          port_value: 9092
    admin:
      access_log_path: /dev/null
      address:
        socket_address:
          address: 0.0.0.0
          port_value: 9901

Key Configuration Points:

  • Exposes an admin interface on port 9901
  • Listens on port 9094 for Kafka traffic
  • Uses the Kafka broker filter to rewrite broker addresses to an external hostname
  • Establishes upstream connections to all Kafka brokers on port 9092

Apply the ConfigMap:

kubectl apply -f envoy-config.yaml


Deploying Envoy

Create a file named envoy-deployment.yaml:

apiVersion: apps/v1
kind: Deployment
metadata:
  name: envoy
  namespace: kafka
spec:
  replicas: 1
  selector:
    matchLabels:
      app: envoy
  template:
    metadata:
      labels:
        app: envoy
    spec:
      containers:
        - name: envoy
          image: envoyproxy/envoy-contrib:v1.25-latest
          args:
            - "-c"
            - "/etc/envoy/envoy.yaml"
          ports:
            - containerPort: 9094
            - containerPort: 9901
          volumeMounts:
            - name: envoy-config
              mountPath: /etc/envoy
              readOnly: true
      volumes:
        - name: envoy-config
          configMap:
            name: envoy-config


Apply the Envoy deployment:

kubectl apply -f envoy-deployment.yaml


Exposing Envoy Externally

Create a file named envoy-service.yaml:

apiVersion: v1
kind: Service
metadata:
  name: envoy
  namespace: kafka
spec:
  type: LoadBalancer
  selector:
    app: envoy
  ports:
    - name: kafka
      port: 9094
      targetPort: 9094
    - name: admin
      port: 9901
      targetPort: 9901


Apply the service:

kubectl apply -f envoy-service.yaml


Maintenance and Verification

If you need to update the Envoy configuration later:

kubectl -n kafka apply -f envoy-config.yaml
kubectl -n kafka rollout restart deployment/envoy


To verify your deployment:

  1. Check that all pods are running:
    kubectl get pods -n kafka


  2. Get the external IP assigned to your Envoy service:
    kubectl get service envoy -n kafka


  3. Test connectivity using a Kafka client with the external address and retrieved user credentials.


Checking the health via envoy admin interface


http://kafka-prod-eastus01.multicastbits.com:9901/clusters

http://kafka-prod-eastus01.multicastbits.com:9901/clusters

http://kafka-prod-eastus01.multicastbits.com:9901/readyhttp://kafka-prod-eastus01.multicastbits.com:9901/stats?filter=kafka


Setup guide for VSFTPD FTP Server – SELinux enforced with fail2ban (RHEL, CentOS, Almalinux)

Few things to note

  • if you want to prevent directory traversal we need to setup chroot with vsftpd (not covered on this KB)
  • For the demo I just used Unencrypted FTP on port 21 to keep things simple, Please utilize SFTP with the letsencrypt certificate for better security. i will cover this on another article and link it here

Update and Install packages we need

sudo dnf update
sudo dnf install net-tools lsof unzip zip tree policycoreutils-python-utils-2.9-20.el8.noarch vsftpd nano setroubleshoot-server -y

Setup Groups and Users and security hardening

if you want to prevent directory traversal we need to setup chroot with vsftpd (not covered on this KB)

Create the Service admin account

sudo useradd ftpadmin
sudo passwd ftpadmin

Create the group

sudo groupadd FTP_Root_RW

Create FTP only user shell for the FTP users

echo -e '#!/bin/sh\necho "This account is limited to FTP access only."' | sudo tee -a /bin/ftponly
sudo chmod a+x /bin/ftponly

echo "/bin/ftponly" | sudo tee -a /etc/shells

Create FTP users

sudo useradd ftpuser01 -m -s /bin/ftponly
sudo useradd ftpuser02 -m -s /bin/ftponly
user passwd ftpuser01 
user passwd ftpuser02

Add the users to the group

sudo usermod -a -G FTP_Root_RW ftpuser01
sudo usermod -a -G FTP_Root_RW ftpuser02

sudo usermod -a -G FTP_Root_RW ftpadmin

Disable SSH Access for the FTP users.

Edit sshd_config

sudo nano /etc/ssh/sshd_config

Add the following line to the end of the file

DenyUsers ftpuser01 ftpuser02

Open ports on the VM Firewall

sudo firewall-cmd --permanent --add-port=20-21/tcp

#Allow the passive Port-Range we will define it later on the vsftpd.conf
sudo firewall-cmd --permanent --add-port=60000-65535/tcp

#Reload the ruleset
sudo firewall-cmd --reload

Setup the Second Disk for FTP DATA

Attach another disk to the VM and reboot if you haven’t done this already

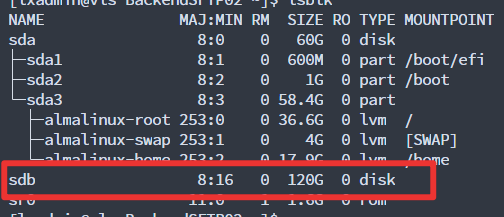
lsblk to check the current disks and partitions detected by the system

lsblk 

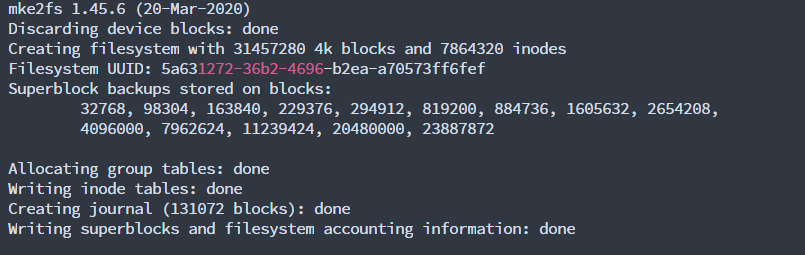
Create the XFS partition

sudo mkfs.xfs /dev/sdb
# use mkfs.ext4 for ext4

Why XFS? https://access.redhat.com/articles/3129891

Create the folder for the mount point

sudo mkdir /FTP_DATA_DISK

Update the etc/fstab file and add the following line

sudo nano etc/fstab
/dev/sdb /FTP_DATA_DISK xfs defaults 1 2

Mount the disk

sudo mount -a

Testing

mount | grep sdb

Setup the VSFTPD Data and Log Folders

Setup the FTP Data folder

sudo mkdir /FTP_DATA_DISK/FTP_Root -p

Create the log directory

sudo mkdir /FTP_DATA_DISK/_logs/ -p

Set permissions

sudo chgrp -R FTP_Root_RW /FTP_DATA_DISK/FTP_Root/
sudo chmod 775 -R /FTP_DATA_DISK/FTP_Root/

Setup the VSFTPD Config File

Backup the default vsftpd.conf and create a newone

sudo mv /etc/vsftpd/vsftpd.conf /etc/vsftpd/vsftpdconfback
sudo nano /etc/vsftpd/vsftpd.conf
#KB Link - ####

anonymous_enable=NO
local_enable=YES
write_enable=YES
local_umask=002
dirmessage_enable=YES
ftpd_banner=Welcome to multicastbits Secure FTP service.
chroot_local_user=NO
chroot_list_enable=NO
chroot_list_file=/etc/vsftpd/chroot_list
listen=YES
listen_ipv6=NO

userlist_file=/etc/vsftpd/user_list
pam_service_name=vsftpd
userlist_enable=YES
userlist_deny=NO
listen_port=21
connect_from_port_20=YES
local_root=/FTP_DATA_DISK/FTP_Root/

xferlog_enable=YES
vsftpd_log_file=/FTP_DATA_DISK/_logs/vsftpd.log
log_ftp_protocol=YES
dirlist_enable=YES
download_enable=NO

pasv_enable=Yes
pasv_max_port=65535
pasv_min_port=60000

Add the FTP users to the userlist file

Backup the Original file

sudo mv /etc/vsftpd/user_list /etc/vsftpd/user_listBackup
echo "ftpuser01" | sudo tee -a /etc/vsftpd/user_list
echo "ftpuser02" | sudo tee -a /etc/vsftpd/user_list
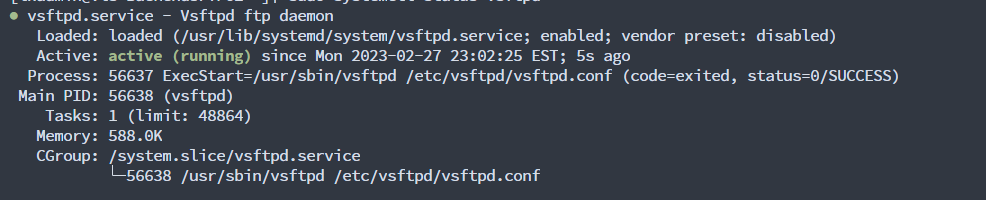
sudo systemctl start vsftpd

sudo systemctl enable vsftpd

sudo systemctl status vsftpd

Setup SELinux

instead of putting our hands up and disabling SElinux, we are going to setup the policies correctly

Find the available policies using getsebool -a | grep ftp

getsebool -a | grep ftp

ftpd_anon_write --> off
ftpd_connect_all_unreserved --> off
ftpd_connect_db --> off
ftpd_full_access --> off
ftpd_use_cifs --> off
ftpd_use_fusefs --> off
ftpd_use_nfs --> off
ftpd_use_passive_mode --> off
httpd_can_connect_ftp --> off
httpd_enable_ftp_server --> off
tftp_anon_write --> off
tftp_home_dir --> off
[lxadmin@vls-BackendSFTP02 _logs]$ 
[lxadmin@vls-BackendSFTP02 _logs]$ 
[lxadmin@vls-BackendSFTP02 _logs]$ getsebool -a | grep ftp
ftpd_anon_write --> off
ftpd_connect_all_unreserved --> off
ftpd_connect_db --> off
ftpd_full_access --> off
ftpd_use_cifs --> off
ftpd_use_fusefs --> off
ftpd_use_nfs --> off
ftpd_use_passive_mode --> off
httpd_can_connect_ftp --> off
httpd_enable_ftp_server --> off
tftp_anon_write --> off
tftp_home_dir --> off

Set SELinux boolean values

sudo setsebool -P ftpd_use_passive_mode on

sudo setsebool -P ftpd_use_cifs on

sudo setsebool -P ftpd_full_access 1

    "setsebool" is a tool for setting SELinux boolean values, which control various aspects of the SELinux policy.

    "-P" specifies that the boolean value should be set permanently, so that it persists across system reboots.

    "ftpd_use_passive_mode" is the name of the boolean value that should be set. This boolean value controls whether the vsftpd FTP server should use passive mode for data connections.

    "on" specifies that the boolean value should be set to "on", which means that vsftpd should use passive mode for data connections.

    Enable ftp_home_dir --> on if you are using chroot

Add a new file context rule to the system.

sudo semanage fcontext -a -t public_content_rw_t "/FTP_DATA_DISK/FTP_Root/(/.*)?"
    "fcontext" is short for "file context", which refers to the security context that is associated with a file or directory.

    "-a" specifies that a new file context rule should be added to the system.

    "-t" specifies the new file context type that should be assigned to files or directories that match the rule.

    "public_content_rw_t" is the name of the new file context type that should be assigned to files or directories that match the rule. In this case, "public_content_rw_t" is a predefined SELinux type that allows read and write access to files and directories in public directories, such as /var/www/html.

    "/FTP_DATA_DISK/FTP_Root/(/.)?" specifies the file path pattern that the rule should match. The pattern includes the "/FTP_DATA_DISK/FTP_Root/" directory and any subdirectories or files beneath it. The regular expression "/(.)?" matches any file or directory name that may follow the "/FTP_DATA_DISK/FTP_Root/" directory path.

In summary, this command sets the file context type for all files and directories under the "/FTP_DATA_DISK/FTP_Root/" directory and its subdirectories to "public_content_rw_t", which allows read and write access to these files and directories.

Reset the SELinux security context for all files and directories under the “/FTP_DATA_DISK/FTP_Root/”

sudo restorecon -Rvv /FTP_DATA_DISK/FTP_Root/
    "restorecon" is a tool that resets the SELinux security context for files and directories to their default values.

    "-R" specifies that the operation should be recursive, meaning that the security context should be reset for all files and directories under the specified directory.

    "-vv" specifies that the command should run in verbose mode, which provides more detailed output about the operation.

"/FTP_DATA_DISK/FTP_Root/" is the path of the directory whose security context should be reset.

Setup Fail2ban

Install fail2ban

sudo dnf install fail2ban

Create the jail.local file

This file is used to overwrite the config blocks in /etc/fail2ban/fail2ban.conf
sudo nano /etc/fail2ban/jail.local
vsftpd]
enabled = true
port = ftp,ftp-data,ftps,ftps-data
logpath = /FTP_DATA_DISK/_logs/vsftpd.log
maxretry = 5
bantime = 7200

Make sure to update the logpath directive to match the vsftpd log file we defined on the vsftpd.conf file

sudo systemctl start fail2ban

sudo systemctl enable fail2ban

sudo systemctl status fail2ban
journalctl -u fail2ban  will help you narrow down any issues with the service

Testing

sudo tail -f /var/log/fail2ban.log

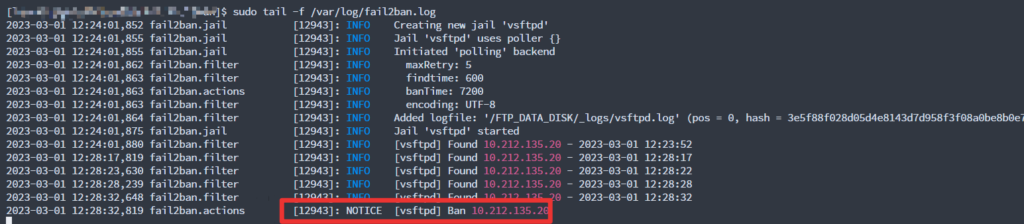
Fail2ban injects and manages the following rich rules

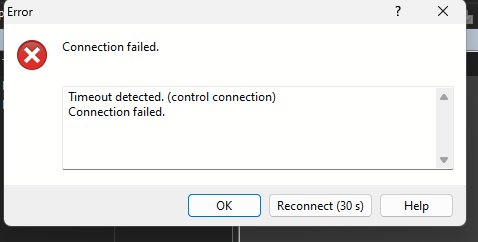
Client will fail to connect using FTP until the ban is lifted

Remove the ban IP list

#get the list of banned IPs 
sudo fail2ban-client get vsftpd banned

#Remove a specific IP from the list 
sudo fail2ban-client set vsftpd unbanip <IP>

#Remove/Reset all the the banned IP lists
sudo fail2ban-client unban --all

This should get you up and running, For the demo I just used Unencrypted FTP on port 21 to keep things simple, Please utilize SFTP with the letsencrypt certificate for better security. i will cover this on another article and link it here